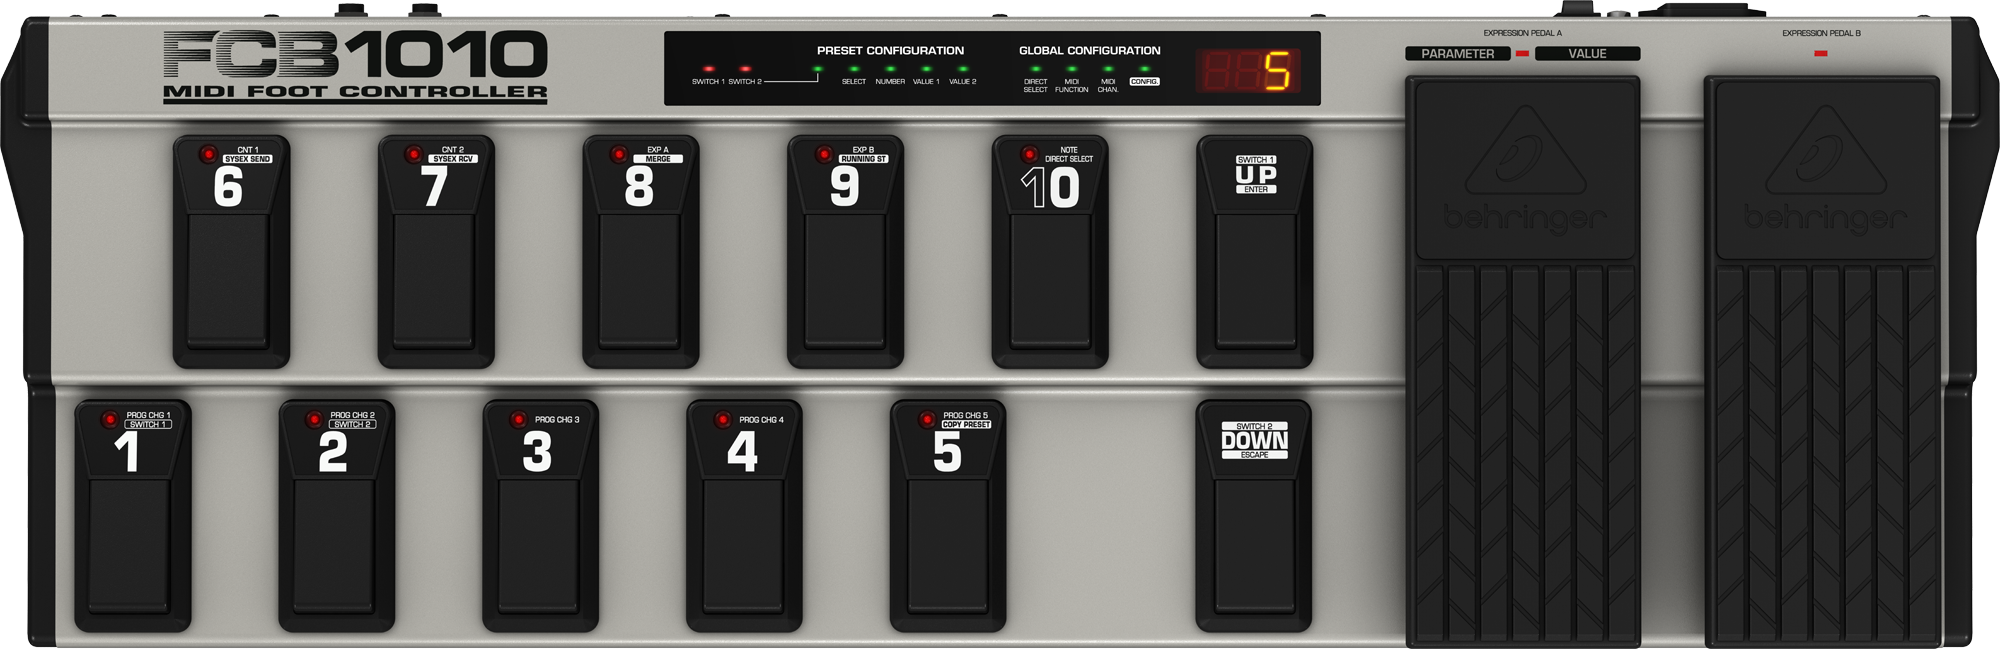
Behringer FCB1010 MIDI Foot Controller
Setting FCB1010 Midi Foot Controller to work with Korg Pa Arrangers.

Whether you play a MIDI instrument, or want an easy way to control your MIDI arsenal, the FCB1010 will help you get the most out of your gear – without tying up your hands or slowing down your performance.
In addition to its impressive MIDI functions, the FCB1010 also provides two jacks for analog switching, and is built rugged enough to handle life on the road.
- FCB1010 Specifications
- How FCB1010 works
- Connections explanation
- Buttons explanation
- Programming FCB1010
FCB1010 Specifications:
- 10 banks of presets, each with 10 fully user-editable presets.
- 2 expression pedals with freely assignable MIDI channel, controller number and range.
- Simultaneous transmission of 5 MIDI program change commands and 2 MIDI controllers per preset.*
- MIDI note commands for trigger and tap-tempo applications.
- 2 programmable and relay-controlled switch 1/4 inch TS jacks (open).
- Global setup allows for individual customization.
- Backup function via MIDI SysEx.
- MIDI merge function allows for soft through and merging of controller and input data.
- MIDI IN, MIDI OUT/Thru Ports allow you use to pass MIDI messages from extra device.
- Built-in power supply ensures trouble-free operation (120V ~60Hz), Standard IEC connector.
- Dimensions (approx.): 2-3/8 x 27 x 8-3/4 inches (60 x 687 x 221 mm).
- Weight (approx.): 7.7 lbs. (3.5 kg).
- Power Consumption: 10 W.
*FCB1010 has range of Program Change 1-128, in many keyboards including Korg Pa range is 0-127, means when you program you need adjust this, .. add +1 to value, example: if you wanna control PC#103 (Start/Stop), then on FCB1010 need to be 104 value (103+1).
How FCB1010 works:
When you power up:
- Initialize MIDI Channels for each PC1-PC5, CC1 & CC2, ExprA & ExprB and Note.
- Initialize SW1 & SW2 work mode (latch or momentary)
- This all setting can be customize in Global Setup.
- All 10 Banks has same setup.
When you change bank:
- Initialize for all controls mode ON or OFF.
- SW1 & SW2 are ready to work.
- for PC1~PC5 initialize Program Change #.
- for CC1 & CC2 initialize Control Change # and Data value.
- for for Expr A & Expr B initialize Control Change #, min & max values.
- for Note initialize note value.*
- except Expr A & B all controls is ready to send.
- Expr A & B are sending MIDI messages dynamically every time you touch (tweak) them.
- All Switches (1~10) works as momentary switch, but after release they not sending anything.**
*Note value is set as number (0-127), number 0 is for note C2, number 127 for note G8.
**If you like control something is requited come back to previous value (reset), you have to use some combination to make works.
When you press button.
- Sending on all enable PC1~PC5 Program Change MIDI messages.
- Sending on all enable CC1~CC2 Control Change MIDI messages.
- Sending if enable Note value MIDI message.
- Initialize Expr A & B if enable value of Control Change #, min & max values.*
- If SW1 and/or SW2 are enable is closing circuit and depend on Global setting mode can be Momentary or Latch.
*every time you press another button, is different independent setting, if you want to keep same setup on entire bank, you need to set on all 10 buttons same.
Connections explanation:
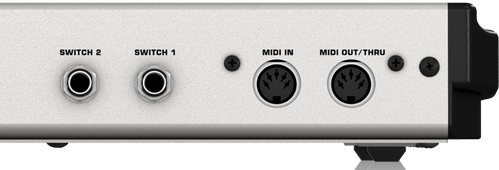
- MIDI IN
- MIDI OUT/THRU
- SWITCH 1
- SWITCH 2
MIDI IN:
MIDI IN is midi port for incoming connection to device, use in FCB1010 to receive System Exclusive messages ( SySex ) with setup configuration.
MIDI IN can be use as Input extra Midi device as Daisy Chain, signal form MIDI IN is bypass to MIDI THRU.
MIDI OUT/THRU:
MIDI OUT/THRU is midi port for outgoing messages, in programming mode can send SySex to PC editor.
In normal mode is sending from this port is sending all messages, means have to be connect to controlled device MIDI IN port.
Same port is use to bypass second device.
If you using MIDI THRU you need careful setup Channels for devices, because port working as merge Midi, all messages from both devices is sending without any filter, is not recommended use same Channel for both devices, unless they control different PC# or CC#.
SWITCH 1 & 2:
Those are 2 independent relay-controlled switches for 1/4 inch TS jacks.
Can be use wherever instrument support sustain kind pedals.
Default they are open and works as momentary switches, but if you in DIRECT SELECT enable mode can also be use as latch switches.
Buttons explanation:
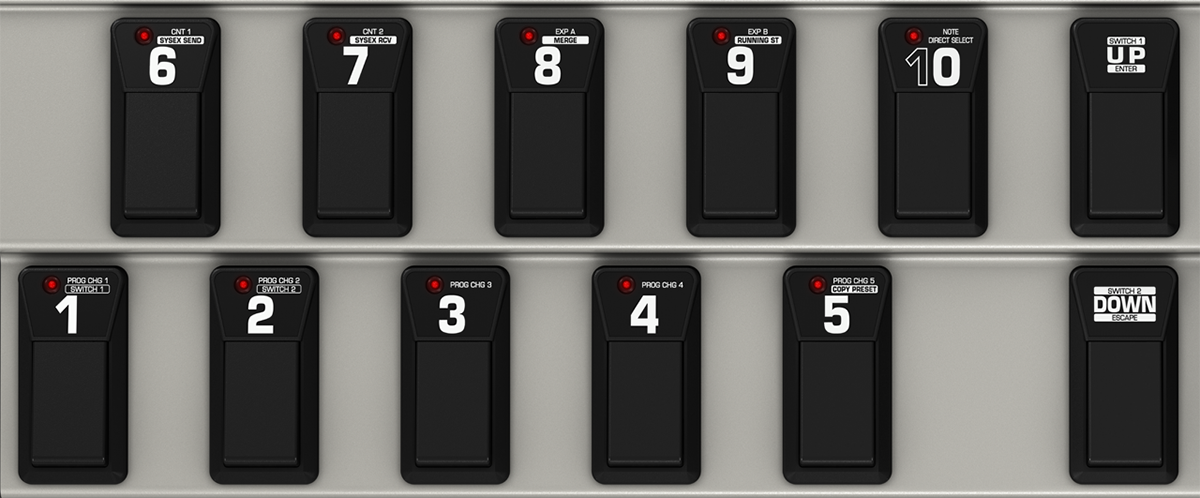
Buttons 1 to 10/0 are in working mode to activate preset #(1-10), all names labeled on them is only mean something when you in programming mode.
In DIRECT SELECT enable mode also to choose banks.
In Programming Mode:
- All buttons 1 to 10/0 is used to set value of controller.
- Button 1 is using in Global mode to set SWITCH 1 and in preset programming to activate PC1 (PROG CHG 1).
- Button 2 is using in Global mode to set SWITCH 2 and in preset programming to activate PC2 (PROG CHG 2).
- Button 3 is using in preset programming to activate PC3 (PROG CHG 3).
- Button 4 is using in preset programming to activate PC4 (PROG CHG 4).
- Button 5 is using in preset programming to activate PC5 (PROG CHG 5).
- Button 6 is using in Global mode to sent SySex Out and in preset programming to activate CC1 (CNT 1).
- Button 7 is using in Global mode to receive in SySex Out and in preset programming to activate CC2 (CNT 2).
- Button 8 is using in Global mode to enable MIDI MERGE and in preset programming to activate Expr A (EXP A).
- Button 9 is using in Global mode to enable RUNNING STATUS and in preset programming to activate Expr B (EXP B).
- Button 10/0 is using in Global mode to enable DIRECT SELECT and in preset programming to activate Note (NOTE).
Programming FCB1010
Is 2 way of program this Foot Controller.
If you want to use software, which is faster and easily you will need Midi cables, Midi PC interface and free editor.
You can download software and read instruction how to you from here.
Programming directly on board is easy, but a little bit tricky on beginning.
I like to explain this simple is possible.
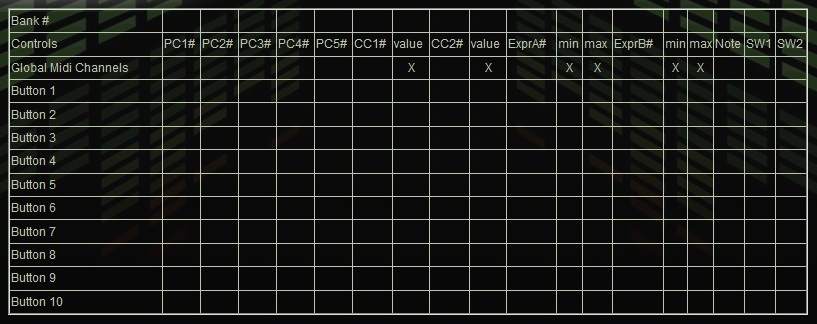
Is very important before you start fully understand how this works, what is possible, what's not.
I suggest do before some flow chart, determinate what and on what channel you want to control, is gonna be more effective when you know exactly.
Click here to see sample of chart you can use.
FCB1010 mainly have to work mode, you can use 10 banks with 10 preset each or you can use DIRECT SELECT mode, which is complete different in real application.
The main different is in DIRECT SELECT mode you don't have 10 banks, you access matrix, means for each preset you need to press 2 buttons, first bank#, then preset.
Example: is DIRECT SELECT disable you changing Bank and you got access to 10 presets by single press, but if DIRECT SELECT is enable you to access 3-rd preset from bank 2, you press button 2(bank) and 3(preset), then even if next needed preset is in same bank (2) you still need press first bank#, then preset#.
I will explain more in DIRECT SELECT enable section.